Hi all,
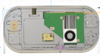
I got some more modelling done today, I've done the button and joystick holders as well as the front of the shell. I'll get some more done tomorrow hopefully.
EDIT: I ought to note, that the Wii boardmodelled here was not my own work, it was from
Jeff's Assortment of Various Models Link: Model - Jeff's Assortment of Various Models | BitBuilt - Giving Life to Old Consoles
EDIT (as to not double psot): 13th July
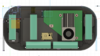
Got some more work done today, button holes and holders for most things (the only one elft to do is power which will be placed along the side of the shell).
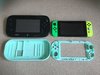
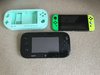
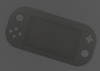
I'm really pleased with how this is shaping up, the dimensions are really a lot smaller than I thought I would be able to make it (around 114 x 213mm, for reference the switch is 102 x 239mm).
The only possible issue I see is with fitting the 18650 cells into the design given they are quite large, but even if they get too big, it shouldn't be an issue, since I can just extend the shell out a bit more.
I've tried to design the system to fit into one side and then the other slots over and screws in, I feel like this will help me when assembling, since when I attempted to assemble a G-Wii, wires travelling over the two halves made it really messy for someone like me whom is abysmal at wire management!
.
EDIT 17th July
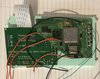
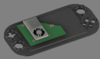
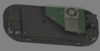
Spent some time prototyping the triggers, I worked out that I could fit the Wii Classic controller triggers on the shell with a dual tact mode, but I would need to trim them down a little. I also made little mounting boards for the audio and power jacks as well as holes for them in the side of the shell.
Now all I have to do is fit in the cells, add a Z trigger, RGB LED (RVL-PMS indicator) and create the fan vent before creating the back of the shell. I can then move onto the aesthetics of the portable, looking more at rounding the edges, adding some bevels and all the wii decals and ensuring everything is working before my first test print.
The thickness looks good enough for 18650 cells, however, due to the way in whcih I have laid out components in this shell,
EDIT: 18th July
Got some more work done today, worked out that I have enough room to fit 6 18650 cells! A lot more than I had expected. I will, however, stick to 5 cells, since I don't want the portable to feel too heavy on one side (the 5th cell is used to offset the weight of the motherboard since it is off-centre).
.
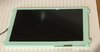
I have also added the last few things, so I am about to do my first test print! Wish me luck!
EDIT: Tuesday 20th July
Hi all,
Been a while. I’ve had issues with my printer. The glass bed is warped and the extruder clicks and jumps off the rails! I’m going to try and set up a 3DTouch module and work out what the issue with the extruder is.
I got one good sheet front print, but haven’t got a back shell complete yet, had issues like the extruder stopping halfway through print (twice), layers not sticking together, then the clicking!
I hope to have a good print done by the end of next week, I’m gonna try following a few guides and see where that gets me, otherwise I might have to call an experienced friend over and get it fixed
EDIT: Friday 30th July
Another unfortunate update... Got a BLTouch hooked up and was getting ready to set it all up and spilt my cup of water on my printer! The heating element on the bed reads -14C and will not heat. I’ve got a new heat bed arriving next week along with a new print bed since the glass bed is warped and I might as well get this all sorted and hope it starts printing again!

")