- Joined
- Apr 17, 2023
- Messages
- 37
- Likes
- 33
Starting off my 2nd attempt at an N64 portable. The first time i tried was about 15 years ago when not too much information was avaliable about setting up such a portable besides hard to find forums, Youtube videos, and pictures on Googles image search.
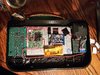
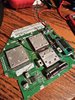
First thing i did was trimmed my N64 board following the Advanced Trim Guide. This was the first time I trimmed a motherboard with the exception of snipping off a usb port on a Ps2 for the Ultra Slim mod. It was definitely nerve racking but following the guide definitely helped. After that I checked the voltage pins on the motherboard to make sure nothing was shorting to ground.
Making sure to remove the PIF circuitry before trimming the board I then ordered some PIF Relocation Break-out boards and awaited the arrival. The boards arrived and I wired them up as per the schematic. I got stuck at one point when my pin 6 and pin 7 were all connected even though the guide said they needed to be reconnected. Gman assured me it was fine and I persisted on.
I wired up some PTH80808WAD regulators with the correct resistors and capacitors and checked that they output 5v and 3.3v respectively.
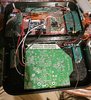
Finally I was almost ready to test. I wired up all the circuitry, finished the relocation of the PIF, extended the cart slot, wired up my screen, and made sure the regulators were properly connected as well.
Flipped the power switch AAAANND.... NOTHING. my screen flickered every few seconds but nothing past that... I checked my wiring with a multimeter and it all checked out... made sure my PIF circuit wasn't wrong and checked voltages kn the motherboard. All was correct but it wasn't booting?
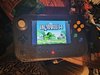
Took the game out (and against many peoples advice) gave it the ol Nintendo Blow. Plugged it back into the cart slot flipped the power switch AAAAND... VOILA! It booted!!!
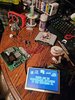
As for now the project is going in the right direction. I didn't take as many pictures as I could have but I do have a working unit.
Also sorry for the messy desk
NEXT UP: Design a case to 3d Print
First thing i did was trimmed my N64 board following the Advanced Trim Guide. This was the first time I trimmed a motherboard with the exception of snipping off a usb port on a Ps2 for the Ultra Slim mod. It was definitely nerve racking but following the guide definitely helped. After that I checked the voltage pins on the motherboard to make sure nothing was shorting to ground.
Making sure to remove the PIF circuitry before trimming the board I then ordered some PIF Relocation Break-out boards and awaited the arrival. The boards arrived and I wired them up as per the schematic. I got stuck at one point when my pin 6 and pin 7 were all connected even though the guide said they needed to be reconnected. Gman assured me it was fine and I persisted on.
I wired up some PTH80808WAD regulators with the correct resistors and capacitors and checked that they output 5v and 3.3v respectively.
Finally I was almost ready to test. I wired up all the circuitry, finished the relocation of the PIF, extended the cart slot, wired up my screen, and made sure the regulators were properly connected as well.
Flipped the power switch AAAANND.... NOTHING. my screen flickered every few seconds but nothing past that... I checked my wiring with a multimeter and it all checked out... made sure my PIF circuit wasn't wrong and checked voltages kn the motherboard. All was correct but it wasn't booting?
Took the game out (and against many peoples advice) gave it the ol Nintendo Blow. Plugged it back into the cart slot flipped the power switch AAAAND... VOILA! It booted!!!
As for now the project is going in the right direction. I didn't take as many pictures as I could have but I do have a working unit.
Also sorry for the messy desk
NEXT UP: Design a case to 3d Print
Attachments
-
 2.4 MB Views: 86
 -
 2.2 MB Views: 94