Worklog SWiitch U

Joined
Mar 17, 2023
Messages
16
Likes
16
Location
Nuremberg, Germany
Hey, I wanted to share my first project, for now titled the SWiitch U.

First time building a portable..here we go:

20230320_214055.jpg


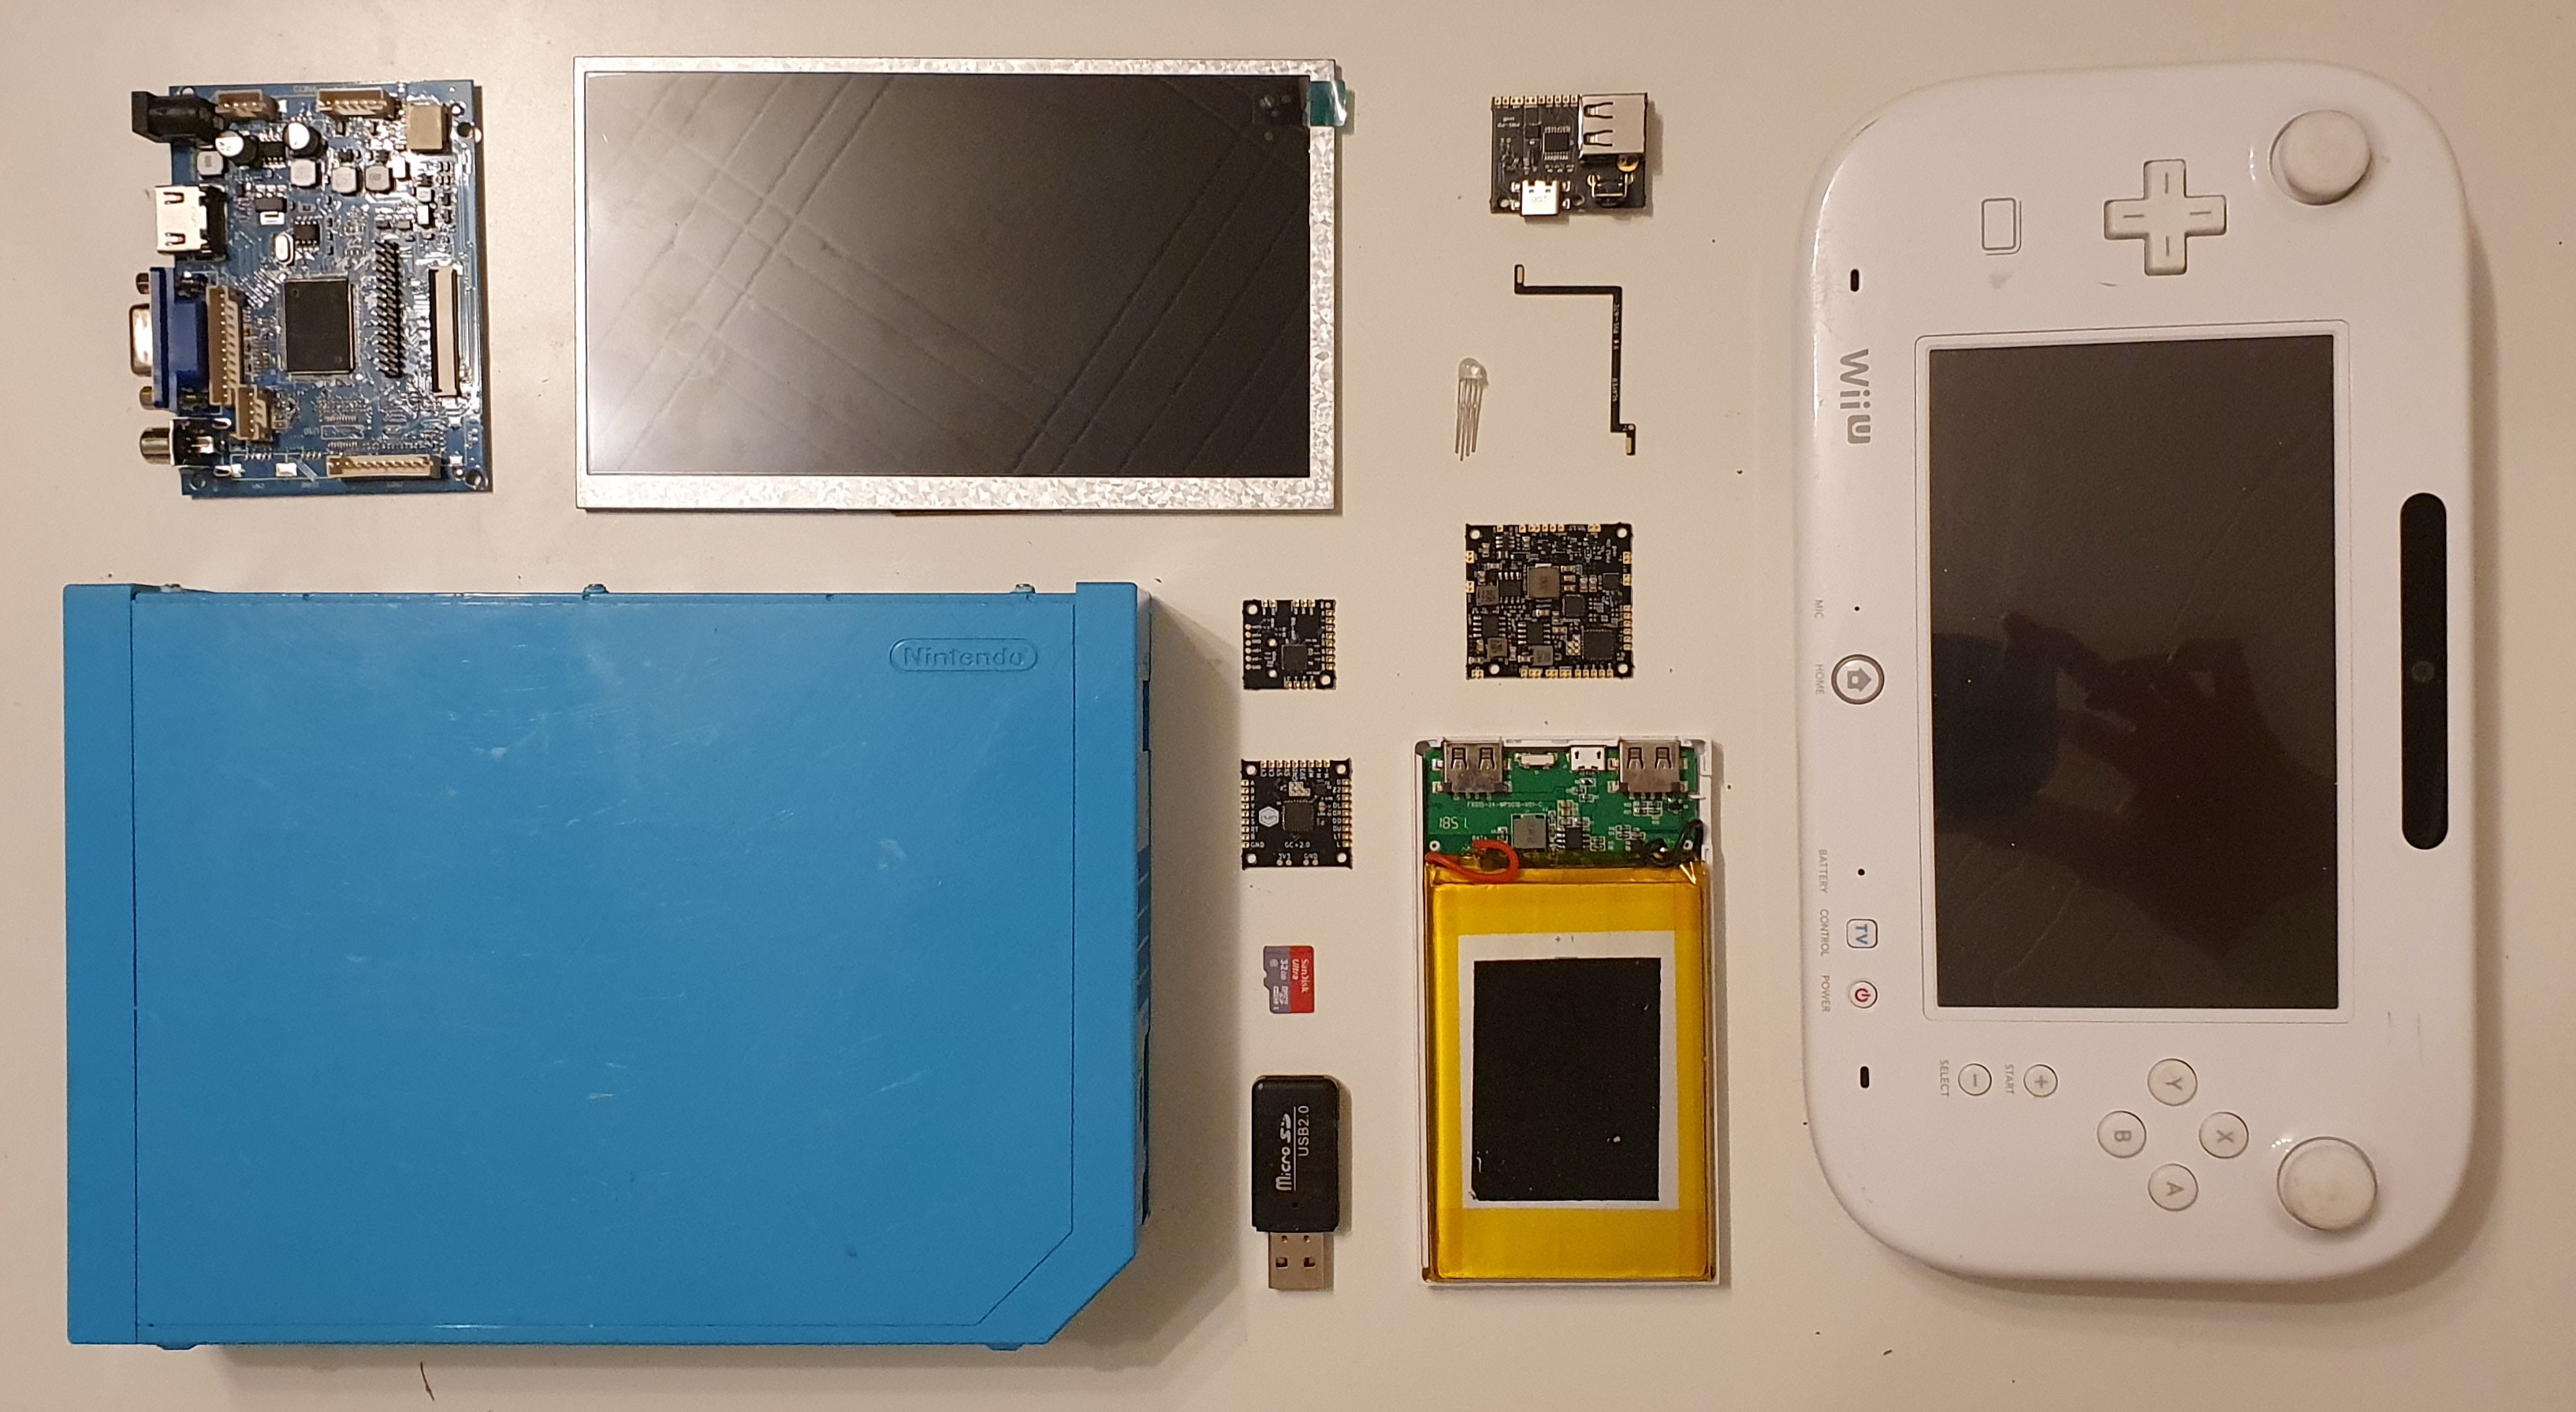
I'm basically planning to stuff the Wii into a defective Wii U Gamepad, which I think is quite optimal space, buildquality and comfort wise.

For the screen I'm going to replace the original screen with a 7" TN panel. It looks quite good, but might require some casemodding to fit the buttons beside.

Batteries will be two pouch cells, 30Wh total, salvaged from a powerbank.

Other features:
-Bluetooth relocation
-WiFi relocation
-upgraded speakers
-analog triggers

features I'll maybe implement down the line:
-larger battery pack
-vibration motor
-mx chip relocation
-docking station (that's the inspiration for the name)
-second USB C port for charging
-button/joystick upgrades
-IR LEDs at the top of the screen to emulate sensor bar (for docked mode)
-HDMI output

That's it for now, what do y'all think?
 

Sm6413

.
Joined
Feb 15, 2023
Messages
27
Likes
6
i like this idea, don't forget to keep us updated.

Will a OMGWTF trim fit inside it you think?
 
Joined
Apr 29, 2020
Messages
92
Likes
113
Nice! Make sure to check out Mundo Yakara’s build process, he documents everything over 6 videos, here is the last one:

Good luck and keep us updated!
 
Joined
Mar 17, 2023
Messages
16
Likes
16
Location
Nuremberg, Germany
Nice! Make sure to check out Mundo Yakara’s build process, he documents everything over 6 videos, here is the last one:

Good luck and keep us updated!
Hey I just watched that video, I think my build might turn out a bit cleaner. Mostly he doesn't use any of the convenient and tiny boards off of 4layertech. Also the original screen and digitizer is an absolute chungus, the one I bought is a lot thinner and will give me quite a bit more room to work with. Also also pouch style batteries are a bit more space efficient :)
 

Attachments

Joined
Apr 29, 2020
Messages
92
Likes
113
Yes absolutely, I just pointed out his videos for reference. I think the portable Wii inside a Wii U gamepad can be made to look OEM with careful design. It’s a great challenge and can’t wait to see your progress!
 
Joined
Mar 17, 2023
Messages
16
Likes
16
Location
Nuremberg, Germany
1679534666774.png

update 1:

dissasembled the gamepad and stripped it from the original components, also cracked open my Wii today and prepared it for trimming.
At the moment I'm working on creating a 3D model of the Gamepad in order to create a component layout eventually :)

Also thinking about maybe designing a custom circuitboard for less messy internals later, but dunno yet.
 
Joined
Mar 17, 2023
Messages
16
Likes
16
Location
Nuremberg, Germany
Update 2:

1679765538809.png


almost finished modelling everything to start trying to fit everything inside. Unfortunately I was not able to process solid objects from the stl files (too many polygons),
so I decided to model them myself roughly, using the originals as reference.
final fit will probably be quite tight, but I'll most likely be able to fit all the components, just not sure in which layout, yet.

I also got to trimming the Wii mainboard today, which went okay:

20230325_164857.jpg

20230325_164906.jpg


only thing I worry about, is that I didn't quite stay outside my line above the gpu and cut one of the three chips in the upper left corner (2nd picture).
Does anyone know if that'll kill it?

At the moment I'm looking for some switches to use for the face buttons and triggers (analog if possible).
I'd love to have some smd mount buttons, optimally some kind of microswitch, which has a longer travel but the snap of a tactile button.
It would be really satifying if they feel like pressing those endstop microswitches:
1679766557497.png
unfortunaly they are too large to fit and not smd :(

Anyone got suggestions?

At last can someone give me a recommendation for a fan/heatsink combo?
A blower style fan will most likely be necessary.
 
Joined
Apr 29, 2020
Messages
92
Likes
113
Awesome progress! And digging the "shoot before asking questions" approach for the case, it'll be more efficient!
 
Joined
Apr 27, 2023
Messages
91
Likes
52
Location
Michigan
love the idea, is that fan the stock one? i don’t think the pms has enough voltage to run that unless it’s a 5v in which case you would need to prob wire it to 5v and ground to get it to work with your build, i had found a few sites that have very low v fans i used one for the ashida build im working on because the one in the BOM was out of stock
 
Joined
Mar 17, 2023
Messages
16
Likes
16
Location
Nuremberg, Germany
love the idea, is that fan the stock one? i don’t think the pms has enough voltage to run that unless it’s a 5v in which case you would need to prob wire it to 5v and ground to get it to work with your build, i had found a few sites that have very low v fans i used one for the ashida build im working on because the one in the BOM was out of stock
Thanks for bringing this up, I actually missed that point. When testing the system, I wondered why the fan would spin up and then stop spinning. So the fan pins are powered on 3.3V then, I guess? My inner perfectionist would hate to not have temperature controlled fan speeds, but I guess just connecting it to 5v is fine.
 
Joined
Apr 27, 2023
Messages
91
Likes
52
Location
Michigan
Thanks for bringing this up, I actually missed that point. When testing the system, I wondered why the fan would spin up and then stop spinning. So the fan pins are powered on 3.3V then, I guess? My inner perfectionist would hate to not have temperature controlled fan speeds, but I guess just connecting it to 5v is fine.
if it’s the stock fan i’m not sure what voltage is required tbh i thought it was 5v iirc but i might be off, that being said the fans most people use for the ashida builds are 3v fans i can link you to the one i purchased that works on the pms boards fan pads
 
Joined
Mar 17, 2023
Messages
16
Likes
16
Location
Nuremberg, Germany
Update 3:

Case modding is now the working: I cut the controls and parts of the screen bezel in order to fit the screen, I'll modify and reattach them later.
20230505_094333.jpg

Backpart of the shell is also almost finished, joined the battery cover to the shell permanently with an abs/acetone mixture. Unfortunately for the last layer of abs-acetone on the back, some dirt got into the mixture, therefore the seem is visible now. Might rework that later.
20230505_094349.jpg

And finally I slimmed down the display driver board, so it will fit inside:
20230505_094317.jpg
 
Top