
- Joined
- Oct 6, 2021
- Messages
- 26
- Likes
- 29
I actually finished this project a month or two ago and had been meaning to do a worklog as I went along but never got around to it. Whoops... Anyway, this is a worklog of my very first portable project. Prior to this I had never touched a soldering iron, done any 3D modeling work like this, or had any knowledge of how a circuit worked at all but I was able to figure it all out and it was a really fun experience overall!
I started off with a feature set that I wanted to incorporate and ended up cutting some of the features as I went along. Originally the plan was to do the advanced trim of the PS2, use VGA video, and load games via raspberry pi. Unfortunately, the raspberry pi I had laying around wasn't actually in working condition so I eschewed it for USB, I wasn't confident enough with my electronics skills to do custom regulators so I just stuck with the standard trim, and after wiring VGA up (I did have a compatible screen for the PS2's VGA) I wasn't able to get the picture centered at all. I could get it kinda close but there was always a little bit cut off on one of the edges. I'm not sure if it was faulty wiring or just a setting that I had to change somewhere but I decided it would just be easier to go with composite video so I did that instead.
Next up I had to learn how to 3D model so I could print out the case, luckily my roommate already had a 3d printer that I could use. I started off just printing individual housings for all of the components I had and then I would just merge them all together in the end.


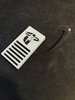
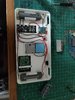
 One of my favorite parts that I designed was the holder for the controller/memory card port. I originally also intended to have this in the portable as well but I decided to cut it because I thought it would take up too much room. Little did I realize at the time how big this thing would eventually turn out. I definitely could have made room for it haha. This is what everything looked like put together in the bottom half of the case in the end.
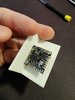
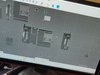
 I ended up using the board from a 3rd party controller as my controls board. I think If I do another PS2 I would definitely use PS2+ so I could use Nintendo Switch joysticks but at that time I didn't think I would be able to set that up. One of the big reasons for wanting to use joycon sticks is the height.
Holy... I didn't realize how tall the PS2 sticks would be in the final design. It also really didn't help that I used 20700 batteries and and had them placed directly under the joysticks in the case. So I have the tallest part in the top half of the case aligned with the tallest part in the bottom half of the case. This is what led to the final product being so dang chonky, hence the name. Definitely will look out for stuff like this while designing in the future lol.
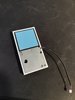
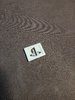
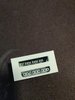
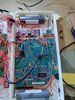
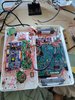
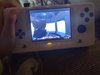
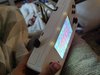
Well here's some pics of the final product.


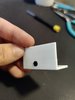
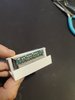
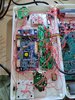
 The wiring for the controls got pretty messy at the end. I ended up using this thicker wire instead of the thin magnet wire I had because it was easier to work with. If any of you have any rats looking for a nice place to nest, feel free to send them my way lol.
So this was my first portable project, the Chonkstation 2! It was a ton of fun learning all of these new skills and having something to show for it at the end. It definitely wouldn't have been possible without these forums or all of the people on here and all of their hard work. I also wanted to shout out @Benge and his BS2 portable. It was one of the first worklogs that really caught my attention and inspired to make my own portable. I think he claimed to have made the thinnest portable PS2 with that one. I may have to make the claim that I've made the thickest one now haha. I think it's sitting around 46mm thick. Someone will have to let me know if anyone has made a thicker one.
And one last shoutout to my boy militaryman_20 over on the forums. Almost any time I ever asked a question on there he was the one who answered and he answered almost all of them. You were an a great help to me in this project! I'd @ you on here but I'm not sure what your name is on the forums.
Next up I'm gonna do a Wii! I think this one will turn out much better than my PS2 did. I have a ton more knowledge going in. For that one I'm going to challenge myself to design my own PCB's so that should be fun!
I started off with a feature set that I wanted to incorporate and ended up cutting some of the features as I went along. Originally the plan was to do the advanced trim of the PS2, use VGA video, and load games via raspberry pi. Unfortunately, the raspberry pi I had laying around wasn't actually in working condition so I eschewed it for USB, I wasn't confident enough with my electronics skills to do custom regulators so I just stuck with the standard trim, and after wiring VGA up (I did have a compatible screen for the PS2's VGA) I wasn't able to get the picture centered at all. I could get it kinda close but there was always a little bit cut off on one of the edges. I'm not sure if it was faulty wiring or just a setting that I had to change somewhere but I decided it would just be easier to go with composite video so I did that instead.
Next up I had to learn how to 3D model so I could print out the case, luckily my roommate already had a 3d printer that I could use. I started off just printing individual housings for all of the components I had and then I would just merge them all together in the end.
Holy... I didn't realize how tall the PS2 sticks would be in the final design. It also really didn't help that I used 20700 batteries and and had them placed directly under the joysticks in the case. So I have the tallest part in the top half of the case aligned with the tallest part in the bottom half of the case. This is what led to the final product being so dang chonky, hence the name. Definitely will look out for stuff like this while designing in the future lol.
Well here's some pics of the final product.
So this was my first portable project, the Chonkstation 2! It was a ton of fun learning all of these new skills and having something to show for it at the end. It definitely wouldn't have been possible without these forums or all of the people on here and all of their hard work. I also wanted to shout out @Benge and his BS2 portable. It was one of the first worklogs that really caught my attention and inspired to make my own portable. I think he claimed to have made the thinnest portable PS2 with that one. I may have to make the claim that I've made the thickest one now haha. I think it's sitting around 46mm thick. Someone will have to let me know if anyone has made a thicker one.
And one last shoutout to my boy militaryman_20 over on the forums. Almost any time I ever asked a question on there he was the one who answered and he answered almost all of them. You were an a great help to me in this project! I'd @ you on here but I'm not sure what your name is on the forums.
Next up I'm gonna do a Wii! I think this one will turn out much better than my PS2 did. I have a ton more knowledge going in. For that one I'm going to challenge myself to design my own PCB's so that should be fun!
Last edited: