
JOSHTIME
.
I know it's been done before. I know I need to finish my summer contest entry. And I know this is strikingly similar to my summer contest entry!
However, what would be real cool other than a Windows computer inside the Gameboy form factor? While working on the SNES x86, I gained much insight into how such a device would function. Here is my idea laid out in a poorly drawn wiring diagram:
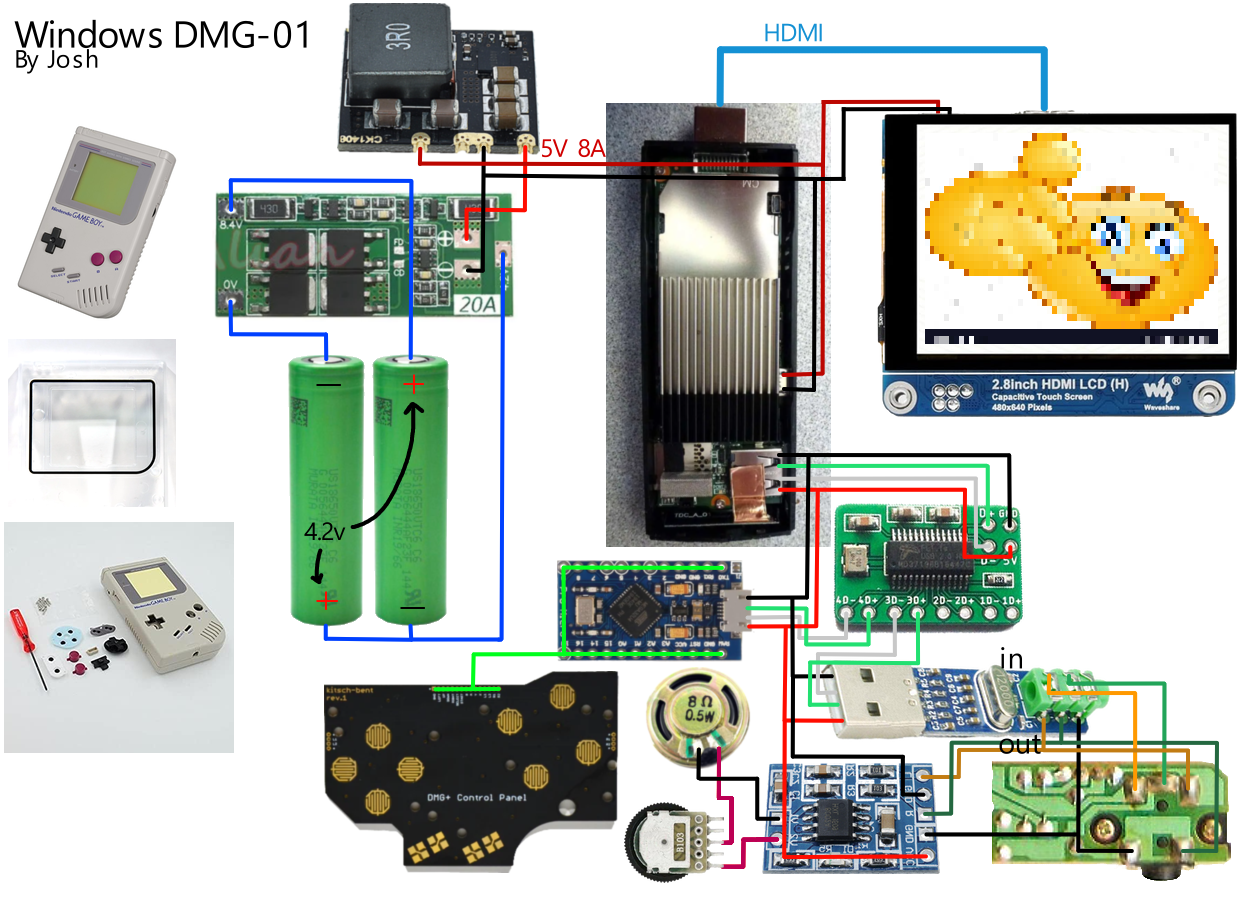
There will be many improvements over the SNES x86. For starters, there will be sound coming from a speaker or a headphone jack. I wasn't able to procure a USB-to-amp board in time for the 2023 contest, so it feels great to squash an imperfection of my creation. I will also design a custom PCB, which gives me the greatest ability of all: design freedom. The SNES x86 was designed around the components, not the looks. Here, I can place the components virtually anywhere. All I need to do is avoid case tweaks that require a major design overhaul. Lastly, it uses 18650 batteries, which I consider a direct upgrade to almost blowing up my room in an attempt to salvage batteries and boards from portable phone chargers.
There are indeed downsides to downgrading the physical footprint of the SNES x86 device. To start, I cannot add a rechargeable battery plug. I know 18650 batteries are supposed to be rechargeable, but I do not see a way for power to reach the batteries from an external power source without reaching the rest of the components connected to the 8.4v to 5v buck converter. The buck converter goes both ways, perfectly allowing me to charge the batteries, but a lot of that charging power also goes into components similarly connected in parallel to the converter. The plan is to do what the original manufacturers of the Gameboy did: leave it to the consumer to figure out how to power it. In other words, someone's gotta take out the batteries and replace them with fresh ones. I'll do the same. Another downside is that I also have to redesign the back housing of the Gameboy. I remain firm on maintaining the general appearance of the Gameboy, but I have very, very high doubts that all those components fit in the shell, especially with half of the Gameboy rear shell being taken up by four AA batteries. The possible addition of shoulder buttons add ambiguity to keeping the back shell as well.
Overall, I am incredibly excited to begin work on this project. Here's a bonus: If the case looks cool, it justifies the approximately $250 price tag for mediocre performance... right?
However, what would be real cool other than a Windows computer inside the Gameboy form factor? While working on the SNES x86, I gained much insight into how such a device would function. Here is my idea laid out in a poorly drawn wiring diagram:
There will be many improvements over the SNES x86. For starters, there will be sound coming from a speaker or a headphone jack. I wasn't able to procure a USB-to-amp board in time for the 2023 contest, so it feels great to squash an imperfection of my creation. I will also design a custom PCB, which gives me the greatest ability of all: design freedom. The SNES x86 was designed around the components, not the looks. Here, I can place the components virtually anywhere. All I need to do is avoid case tweaks that require a major design overhaul. Lastly, it uses 18650 batteries, which I consider a direct upgrade to almost blowing up my room in an attempt to salvage batteries and boards from portable phone chargers.
There are indeed downsides to downgrading the physical footprint of the SNES x86 device. To start, I cannot add a rechargeable battery plug. I know 18650 batteries are supposed to be rechargeable, but I do not see a way for power to reach the batteries from an external power source without reaching the rest of the components connected to the 8.4v to 5v buck converter. The buck converter goes both ways, perfectly allowing me to charge the batteries, but a lot of that charging power also goes into components similarly connected in parallel to the converter. The plan is to do what the original manufacturers of the Gameboy did: leave it to the consumer to figure out how to power it. In other words, someone's gotta take out the batteries and replace them with fresh ones. I'll do the same. Another downside is that I also have to redesign the back housing of the Gameboy. I remain firm on maintaining the general appearance of the Gameboy, but I have very, very high doubts that all those components fit in the shell, especially with half of the Gameboy rear shell being taken up by four AA batteries. The possible addition of shoulder buttons add ambiguity to keeping the back shell as well.
Overall, I am incredibly excited to begin work on this project. Here's a bonus: If the case looks cool, it justifies the approximately $250 price tag for mediocre performance... right?
Last edited: