Xenii
.
- Joined
- Feb 16, 2024
- Messages
- 74
- Likes
- 283
- Location
- Switzerland
- Portables
- Xii-Boy Original, Xii-Boy Pocket, Xii-Boy Ultra
Hi all !
Welcome to the first episode of the Xii-Boy Ultra's worklog !

I'm very proud of the Xii-Boy Pocket's result. However, there are still some things I need to upgrade.
If you liked the Xii-Boy Pocket, you'll love the Xii-Boy Ultra")
I will do my best to update this worklog as much as possible. I hope you'll enjoy it !
Let's start !
What are the goals of this new Xii-Boy Ultra ?
The main goal is to make the cleanest and easiest portable Wii to build.
I'll ask you a simple question: What makes a portable clean or not ?
- The wires: There is nothing uglier than a spaghetti portable.
My solution ? Get rid of every wires inside the Xii-Boy.
To give an idea, the Xii-Boy Original has approximately 70 wires and the Xii-Boy Pocket around 15.
This is great, but not enough.
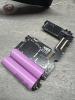
The Xii-Boy Ultra will normally have no wires.
This huge challenge will make the Xii-Boy Ultra very clean and, above all, very easy to assemble / disassemble.
One of the biggest flaw of the Xii-Boy Original / Pocket is the old RVL-PMS.
This board is amazing, however, it has two major flaws.
The first one is that the PMS has a problem with charging. If you don't put your portable in the transport mode, it will discharge your
batteries so low that you won't be able to recharge them.
The second one is the battery level indicator. Showing red when we're under 20% is great, but not enough precise.
To correct that, I'll use all the 4LayerTech PCBs.
Considering the RVL-PMS 2 is much better optimized, I'll get a bit better battery life.
I'll also be able to see the temperature and the battery level at any moment. Much better !
It will also allow to automatically set the fan speed. This is also a flaw of the old Xii-Boys.
The fan constantly plugged on 5V is great, it cools the Wii flawlessly, however, it makes a lot of noise.
The best 4LayerTech board is probably the RVL-DD.
This board gives the best video quality possible. Unlike VGA, I'll be able to use the Wii menu and, above all, all the games.
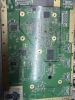
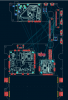
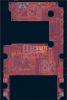
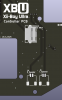
My favorite part about 4LayerTech boards, is that I can solder them on another PCB. That means I'll be able to design a big Main PCB.
This new Main PCB will also give me the opportunity to remove the 2 triggers PCBs the Xii-Boy Pocket has. It will also replace a lot of wires,
especially the ones between the RVL-PMS and the Main PCB.
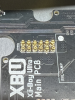
I also want to remove the voltage wires between the PMS and the Wii motherboard. My 22 AWG wires are very hard to bend. Putting the Wii in place when it is plugged to the PMS is very tricky and very scary. Instead, I'll use the Power Strip or a bit remixed version.
I also want to innovate. The Xii-Boy Pocket's triggers are great and give a very good feeling.
However, I really want to get rid of the old THMF07 Dual Tact Button.
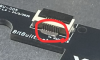
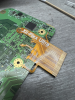
Instead, I'll use analog triggers. I'm currently testing the @Wesk 's analog trigger system prototype using Nintendo Switch Joysticks.
This system is great because it is the only one which fits in the small, compact and thin Xii-Boy case. Also, the Switch joysticks are very precise.
I currently have good results. I'll keep you updated here
Also, I didn't put buttons to change the screen settings. That means you cannot change the luminosity of the Xii-Boy Pocket's screen.
I might change that for the Xii-Boy Ultra.
Also, I'll entirely remodel the case. The Xii-Boy Pocket's case is made from the original Xii-Boy case.
That means the case isn't very optimized. From the outside, it changes nothing. But if I want to make any changes, this is tricky, and take a lot of time.
For the Xii-Boy Pocket, I did publish the case files on GitHub. That's great, but I only shared the STL files.
For the Xii-Boy Ultra, I'll share the STL and the f360 file. That means making an edit on the case will be very easy.
One of the main goal of this new Xii-Boy Ultra is to make the new easiest portable Wii to build.
I also want to make a complete documentation about it. I'll speak about everything you need to know to start your first portable.
From how to solder to where to put the final screw, including the software part. I'll probably make a Git Book.
To sum up, here are all the changes / upgrades the Xii-Boy Ultra will have:
- Wire Free build for a better and easier assembly / disassembly process.
- All the 4LayerTech boards for a better portable.
- RVL-DD for the best compatibility and video quality.
- New Analog Trigger system.
- Maybe luminosity control buttons.
- New case.
- Better documented.
That's it !
This was a very small episode. I just wanted to share all the ideas and upgrade I want to implement !
If you have any ideas to upgrade the Xii-Boy, or any questions, do not hesitate to tell / ask me
I hope you're hyped by this new Xii-Boy !
Have a wonderful day and see you next time !
Welcome to the first episode of the Xii-Boy Ultra's worklog !
I'm very proud of the Xii-Boy Pocket's result. However, there are still some things I need to upgrade.
If you liked the Xii-Boy Pocket, you'll love the Xii-Boy Ultra
I will do my best to update this worklog as much as possible. I hope you'll enjoy it !
Let's start !
What are the goals of this new Xii-Boy Ultra ?
The main goal is to make the cleanest and easiest portable Wii to build.
I'll ask you a simple question: What makes a portable clean or not ?
- The wires: There is nothing uglier than a spaghetti portable.
My solution ? Get rid of every wires inside the Xii-Boy.
To give an idea, the Xii-Boy Original has approximately 70 wires and the Xii-Boy Pocket around 15.
This is great, but not enough.
The Xii-Boy Ultra will normally have no wires.
This huge challenge will make the Xii-Boy Ultra very clean and, above all, very easy to assemble / disassemble.
One of the biggest flaw of the Xii-Boy Original / Pocket is the old RVL-PMS.
This board is amazing, however, it has two major flaws.
The first one is that the PMS has a problem with charging. If you don't put your portable in the transport mode, it will discharge your
batteries so low that you won't be able to recharge them.
The second one is the battery level indicator. Showing red when we're under 20% is great, but not enough precise.
To correct that, I'll use all the 4LayerTech PCBs.
Considering the RVL-PMS 2 is much better optimized, I'll get a bit better battery life.
I'll also be able to see the temperature and the battery level at any moment. Much better !
It will also allow to automatically set the fan speed. This is also a flaw of the old Xii-Boys.
The fan constantly plugged on 5V is great, it cools the Wii flawlessly, however, it makes a lot of noise.
The best 4LayerTech board is probably the RVL-DD.
This board gives the best video quality possible. Unlike VGA, I'll be able to use the Wii menu and, above all, all the games.
My favorite part about 4LayerTech boards, is that I can solder them on another PCB. That means I'll be able to design a big Main PCB.
This new Main PCB will also give me the opportunity to remove the 2 triggers PCBs the Xii-Boy Pocket has. It will also replace a lot of wires,
especially the ones between the RVL-PMS and the Main PCB.
I also want to remove the voltage wires between the PMS and the Wii motherboard. My 22 AWG wires are very hard to bend. Putting the Wii in place when it is plugged to the PMS is very tricky and very scary. Instead, I'll use the Power Strip or a bit remixed version.
I also want to innovate. The Xii-Boy Pocket's triggers are great and give a very good feeling.
However, I really want to get rid of the old THMF07 Dual Tact Button.
Instead, I'll use analog triggers. I'm currently testing the @Wesk 's analog trigger system prototype using Nintendo Switch Joysticks.
This system is great because it is the only one which fits in the small, compact and thin Xii-Boy case. Also, the Switch joysticks are very precise.
I currently have good results. I'll keep you updated here
Also, I didn't put buttons to change the screen settings. That means you cannot change the luminosity of the Xii-Boy Pocket's screen.
I might change that for the Xii-Boy Ultra.
Also, I'll entirely remodel the case. The Xii-Boy Pocket's case is made from the original Xii-Boy case.
That means the case isn't very optimized. From the outside, it changes nothing. But if I want to make any changes, this is tricky, and take a lot of time.
For the Xii-Boy Pocket, I did publish the case files on GitHub. That's great, but I only shared the STL files.
For the Xii-Boy Ultra, I'll share the STL and the f360 file. That means making an edit on the case will be very easy.
One of the main goal of this new Xii-Boy Ultra is to make the new easiest portable Wii to build.
I also want to make a complete documentation about it. I'll speak about everything you need to know to start your first portable.
From how to solder to where to put the final screw, including the software part. I'll probably make a Git Book.
To sum up, here are all the changes / upgrades the Xii-Boy Ultra will have:
- Wire Free build for a better and easier assembly / disassembly process.
- All the 4LayerTech boards for a better portable.
- RVL-DD for the best compatibility and video quality.
- New Analog Trigger system.
- Maybe luminosity control buttons.
- New case.
- Better documented.
That's it !
This was a very small episode. I just wanted to share all the ideas and upgrade I want to implement !
If you have any ideas to upgrade the Xii-Boy, or any questions, do not hesitate to tell / ask me
I hope you're hyped by this new Xii-Boy !
Have a wonderful day and see you next time !

 I might need to adjust a bit the tolerances, which seem to cause problems on some printers.
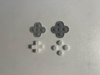


")