Worklog [2023 Contest Entry] SEGA DreamXtreme!

Joined
Apr 3, 2023
Messages
54
Likes
231
Location
Wisconsin
Portables
Too many
dream.png

After much bin digging and deliberation, I've decided on a projekt! Found a whopping three Dreamcast motherboards sitting in my junk bin, so it seemed like a good choice knowing how often things like to randomly die on me lol.

The plan is to get it as small as possible while retaining the DD (I'm crazy, I know)...may or may not include a VMU...actual work shall begin once I got my workshop cleaned up a bit ;)
 
Joined
Apr 3, 2023
Messages
54
Likes
231
Location
Wisconsin
Portables
Too many
dream.png

EPISODE 1: Function & Disappointment

...and so work begins!

I'm hoping to be able to build this using what I already have in my workshop...I found a couple of these guys sitting around. Adjustable output, rated for upwards of 4A...should work fine :)
IMG_20230619_105229285.jpg
I also have plenty of speakers and buttons and such in stock.

Next up...getting the DC to power on sans a fan.

Due to a surprising lack of info available for the VA2 board, I was sort of on my own here. Fortunately, I knew what chip to poke at, resulting in a quick and easy trace cutting and solder blobbing.
IMG_20230619_103840145.jpg IMG_20230619_104155479.jpg

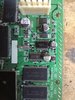
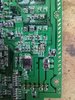
aaaand SUCCESS!! (ignore the lack of ribbon on the DD..I did find one later)
IMG_20230619_130016062.jpg

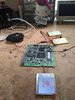
Unfortunately, that was all the success I could muster...as is the case for me, something always fails to work or stops working for no apparent reason.

First issue is that while one board will actually try to boot a disk, it won't output any video, only a black screen.

The others will boot up and give video, but won't spin the disk up properly (so no game loading).

...and then there the most annoying issue: NONE of my 3 mobos will give me VGA video. I can't win >_<

I know the fancy screen I got via our homey YveltalGriffin will work with the VGA, as I tested it with my previous and still working DC portable. So it's probably safe to say that the screen isn't the issue. Worst case scenario, I guess I can go composite only lol


In our next episode....hopefully I'll figure out the video/disk issues....
 
Joined
Apr 3, 2023
Messages
54
Likes
231
Location
Wisconsin
Portables
Too many
dream.png

EPISODE 2: Chops & Defiance
After much dinking with the video outputs...I've come to the conclusion that the fancy screen just doesn't like the VGA output of the dreamcast. I know those boards output VGA from earlier testing, yet it just keeps doing diddly. I even retested with the other DCp and now there's no video at all with that, too. Not sure what to do, but I'll figure something out hopefully...

For now, I'm just gonna use my trusty composite-only screen so I can move onto other things...

What things you may ask? CHOP CHOP, Baby!

Again, there's diddly on the VA2 board for cut information, so It's all on me to figure out what can be eliminated...

Let's start simple...filter caps!
1.jpg


...and then moving into various semiconductors...
13.jpg


After much component removal...and one relocation, it was time to see if my cut would work...
2.jpg


Sure enough, my calculations were correct! The cuts had no effect on it! Well almost no effect...it severed the 12v line, but that's an easy peasy fix.
3.jpg

Thus completes the first cut....the other side is next. If somehow I'm right again, this will narrow the board more than enough to fit well within the disk's diameter :D

I also now know this board does boot disks, it was just a bad laser...so hopefully it'll maintain that ability after the next chops lol.

Next episode: DISCO FEVER!?
 

YveltalGriffin

First Wii U Trimmer
.
Joined
Jun 7, 2016
Messages
308
Likes
1,165
Location
South Florida
Portables
5
Woohoo, the Dreamcast is getting some love! A VA2.1 based portable will be super unique. Keep up the good work!

After much dinking with the video outputs...I've come to the conclusion that the fancy screen just doesn't like the VGA output of the dreamcast.
The sillkscreen on the UT-HDMI035 driver board is incorrect-- H-Sync and V-Sync are swapped. Maybe that's the cause of your issues? You did say you got VGA working on it with your previous portable though, so IDK.

Also, make sure you're shorting both pins 6 and 7 on the DC AV port to GND, since the group buy LCD only accepts 480p VGA and not 480i.
 
Joined
Apr 3, 2023
Messages
54
Likes
231
Location
Wisconsin
Portables
Too many
The silkscreen is backwards? Aaaaah...that could explain why i got video on one and not again...I may very well have connected it backwards on accident and that's why it worked lol
 
Joined
Apr 3, 2023
Messages
54
Likes
231
Location
Wisconsin
Portables
Too many
dream.png

EPISODE 3: DISCO...DELAY!

Tried out the swapped Hsync and Vsync lines...and that was indeed the problem! I have VGA now, and it's oh so nice!

With that, it was onto figuring out some wiring.

After taking waaaaaaaaaaay too long figuring out where all the disk drive lines go...it was finally time to get to chopping the other side!
1.jpg

first depopulate...

2.jpg

Then we amputate once again!

IMG_20230621_135051352.jpg

Did have to relocate a few pieces...

...and BEHOLD!

3.jpg


It is now narrower than a disk is round! awww yeah! It SHOULD still work.....just gotta get the DD hooked up and pray lol


NEXT EPISODE: DISCO FEVER...FOR REAL?!
 
Joined
Sep 27, 2016
Messages
420
Likes
902
Awesome! I'm digging the entertaining comic book like worklog approach!
 
Joined
Apr 3, 2023
Messages
54
Likes
231
Location
Wisconsin
Portables
Too many
dream.png

EPISODE 4: DISCO is DEAD

Well, sadly....DD doesn't quite work. It powers on, laser bounces around and it tries to seek...But then it refuses to spin the disk up to the appropriate speed and just returns to the menu. Not sure what's causing this, but I got a silly scope to poke at it with...and poke at it, I shall!


But for now, let's continue trimming a bit, shall we?

First thing, gonna make the part relocation here a bit more pretty...
IMG_20230622_104204131.jpg


aaand then I decided that it needs to be narrower..commenced to removing the ugly plug thingy and a few other pieces...
IMG_20230622_114327466.jpg


And then I trimmed it down to...slightly narrower! Managed to get it going with even fewer parts, too!
2.jpg


And then...test!
1.jpg


Still works...and with dat smexy VGA! Just ignore Hello Kitty. It was already built and just lying around. Good enough for now ;)

Had an odd issue were the picture was flickering on the first test fire...but then it just went away. Odd...hopefully that's not the harbinger of something to come lol

Anyway, there's still some more trimming to do yet. As while the board is narrower than the disk, it's still too tall for my case design. Gotta figure out what all I can get away with removing and then CHOP CHOP some more!


Join us next time; same Bit-time, same Bit-channel for EPISODE 5 of DREAM XTREME!! *plays killer theme music*
 
Joined
Apr 3, 2023
Messages
54
Likes
231
Location
Wisconsin
Portables
Too many
dream.png

EPISODE 5: Shortened & Sweetener

Well, weekend's over...time to get back to work!

First thing on the list...let's chop chop some more!

Found a few more components that don't appear to be needed for operation...

First a few more caps.
1.jpg

Some resistors and a transistor for good measure!
2.jpg


Then wired it up for perma-vga mode!
3.jpg


And now...onto the final cuts!
4.jpg


Look at it! It's beautimus!
5.jpg


Hey...that looks familiar...
6.jpg


So far, it all still works! There is a bit of distortion in the video, but I think that's just a power issue...hopefully...

As for the DD, I think I found the problem that's plaguing it! But I'm out of time for today, so it'll have to wait for tomorrow.


So don't touch that dial! There's more exciting adventures in our Next Episode: The whirling disk of death!
 
Joined
Apr 3, 2023
Messages
54
Likes
231
Location
Wisconsin
Portables
Too many
dream.png

EPISODE 6: The Whirling Disk of Death!
...and the work continues!

Got down and did some serious wiring with good ol' cheater wire (aka magnet wire).

It looks like a hot mess...'cause it is. This is just temporary to make sure it actually works before I go any further.
1.jpg


after spending way too long wiring that hot mess, it was time for the test!
2.jpg


Well...it sort of works! Got the disk spinning at full speed at least!

Unfortunately, it only went to the Dreamcast logo and froze.

Eventually, I did find what was causing it to freeze. It was just a severed 3.3v line that needed reconnecting.
4.jpg


Too bad I broke all of what was left of the traces on the DD plugs while finding this (you can see above that they're barely hanging on lol)

I really didn't feel like redoing them, plus I was low on time. So I guess a boot test will have to wait for tomorrow.


NEXT EPISODE: Das Boot...maybe?
 
Joined
Apr 3, 2023
Messages
54
Likes
231
Location
Wisconsin
Portables
Too many
dream.png

EPISODE 7: DAS BOOT!

Well..late start today (stupid grass needs to stop growing!), so not much getting done today...

...however some stuff did get done and the time is NIGH!
1.jpg


ROLL THAT BEAUTIFUL BEAN GAME FOOTAGE!
IMG_20230628_125041388.jpg

(NBA 2K1 FTW)

ALL RIGHT! We're in business, baby!

The next phase is coming in hot! ..hopefully I won't get such a late start tomorrow for more projekt time :)


NEXT EPISODE: The Controllering!
 
Joined
Apr 3, 2023
Messages
54
Likes
231
Location
Wisconsin
Portables
Too many
dream.png

[ACT II]
EPISODE 8: The Controllering.
yeeee the projekt rolls on!

Dug through the junk bin and found one of these bad boys! A good old 3rd party controller.

1.jpg


As with many 3rd party controllers, the innards are pretty simple...
IMG_20230529_143249729.jpg


...Which makes getting this into a usable form as easy as...

1. Depopulate!
IMG_20230601_115020085.jpg

2. Chop chop!
IMG_20230601_115559480.jpg

3. Rebuild!
IMG_20230601_123334470.jpg

Well, that was mostly painless...everything essential is still there, so it should still work .


Next on the list is getting the big board that will be the controller/vga box/audio amp/everything else cut out and start attachin' dem buttons and whatever else! :D

Join us for our next episode: Board to be button!
*plays parody of Steppenwolf classic at high volume*
 
Joined
Apr 3, 2023
Messages
54
Likes
231
Location
Wisconsin
Portables
Too many
dream.png

EPISODE 9: Board to be Button!


Well, it's been a long break...perhaps too long...BUT, we're back to work once again and it's controller time!


First thing first...let's get our board cut out!
IMG_20230706_115808084.jpg

Yeah...good old solderable breadboard...

2.jpg

Got my spots all figured out and marked up...ready for cuts and drillin!


3.jpg


DONE!
IMG_20230707_120327393.jpg

Now, it's time to attach some buttons and wires!

For the joystick...I have a bunch of these little Adafruit deals. Tested it out ahead of time and it worked fine with this controller board :)
1.jpg

eeeeww...blurry picture is blurry >_<


aaaand then, after an hour...or two..or fifty....
4.jpg


Beautiful wiring pr0n ;)
IMG_20230707_151700775.jpg

All these boxes of junk, and I can't find a single SMD 10k resistor...had to go with the trusty thru-holes!

and in case it's not obvious...
IMG_20230707_151650303.jpg

...there will be no analog L&R functionality. Just couldn't find the room. So instead, I just drilled some more holes and mounted a couple of buttons upside down, to be actuated by a push-rod of some kind. I doubt it'll be much of a loss since most games don't really lose anything without analog triggers.


Next things to add will be the VGA box circuit, and the sound gear!

So don't touch that dial! We'll be right back after these...messages? ;)
 
Joined
Apr 3, 2023
Messages
54
Likes
231
Location
Wisconsin
Portables
Too many
dream.png

EPISODE 10: SOUND FORCE GO!
After slacking off a bit, I'm finally back on task...

For the amplifier, I dug out a PAM5803 3W stereo amplifier. Very simple, very efficient and I have plenty of them in the junk bin :)

Now, after much wiring....we have sound power installed!
2.jpg


Maor of that beautiful wiring pr0n ;)
1.jpg


Wires are starting to look a bit jumbled up...but when you have so many of them, it's hard to avoid LOL.

All that remains for this board is he VGA circuit. It's gonna be a bit tight, but it should fit.

That'll do it for today...........

*1930s announcer voice*
What's in store next for our hero? Will the VGA Box fit, or will everything burst into flames for no apparent reason? Find out in our next exciting episode of DREAM XTREME!
 
Joined
Apr 3, 2023
Messages
54
Likes
231
Location
Wisconsin
Portables
Too many
dream.png

EPISODE 11: For Whom the 'Troller Tolls

Slow progress is slow, but the mission continues!

First, attaching the RGB filter caps...
1.jpg


Then attaching the mounting points for the LCD board...
2.jpg


Then, a late night test fitting...
3.jpg


AAAAAAAND then with that fitting, it hit me...one of those caps was in the worst possible spot >_<

FIXED!
4.jpg


then, after too much wiring...the unified controller/VGA box/audio amp/LCD stuffs Board is all but complete!
5.jpg


I should be able to squeeze that ribbon through, but apparently I measured wrong. Oh well. I can either carve it some more, or just not use that central pylon.
6.jpg


All that remains now is to attach mounts for the Dreamcast's Mobo.

Most importantly of all, nothing randomly burst into flames! Aaaawww yeah!


*cues ominious music*
That does it for today's episode! Join us next time for another epic adventure in the realm of the DREAM XTREME!
 
Joined
Apr 3, 2023
Messages
54
Likes
231
Location
Wisconsin
Portables
Too many
dream.png

EPISODE 12: Outta Control

After being forced to take some time away due to a rather painful thumb injury...we're back on track!

I decided against doing the DC mobo mounts just yet as I really should test the controller and all that jazz first!
1.jpg


Unfortunately, as is always the case...nothing ever works on the first try. Or the third or fourth for that matter.

First problem was the 5v line got shorted to ground, causing the DC to not boot up. After some poking, I found the culprit; a random solder blob! Removed it, and the boots once again!

But, as expected with that problem solved, the problems continued...

Next issue was the sound. While there was indeed sound, it was pretty bad. Looks like the pot I pulled from the junk bin is well, junk lol. Good thing I have more!

The last problem is that the controller doesn't work at all. I do have a couple of ideas as to what's causing this. But, those will have to wait for tomorrow.

2.jpg


At least my rebuilt VGA box works perfectly fine! :)


*epic music theme*
Will our hero succeed in this endeavor? Will he foolishly injure himself again? Find out in our next exciting episode of DREAM XTREME!
 

Wesk

Undervolting....
Staff member
.
.
Joined
Jul 12, 2017
Messages
874
Likes
2,195
Location
Queensland, Australia
The last problem is that the controller doesn't work at all. I do have a couple of ideas as to what's causing this. But, those will have to wait for tomorrow.
Have you taken a look at using Maplepad? (developed by @YveltalGriffin) it's a great DC controller emulator that only requires a Pi Pico and will even allow you to use an OLED display for the VMU.
 
Joined
Apr 3, 2023
Messages
54
Likes
231
Location
Wisconsin
Portables
Too many
I know nothing of this Maplepad...nor do I even know what a Pi Pico is XD I assume the pico is some variation of that rasberry pi thingy?
 
Top