What's new

N64 portable - PMS Questions

Joined
Nov 10, 2024
Messages
4
Likes
2
Hi @all,
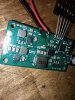
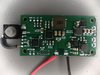
yesterday I tried to assemble the custom N64-PMS as shown in the picture below.

I never did SMD soldering before and fitting all the parts was hard for me.
I got some bridges, but managed them with some flux and hot air.

Now there are some questions/problems:
1. I attached the battery, but I don't get the needed voltages.
My 3v3 Pad has 4.2V and 5V Pad has around 0.6V. I heated up all parts again, without a change.

2. I don't understand, what's the buttons function.
It's a tactile switch and no switch, right?
Is that a reset button?

3. What are T- and T+ Pads?

Thanks in advance and best regards
Fisatec

IMG_20241222_000942.jpg
 

Stitches

2 and a Half Dollarydoos
Staff member
.
.
Joined
Feb 5, 2017
Messages
4,292
Likes
3,328
Location
Banana Bender Land, Australia
Portables
6
Somehow the battery voltage is just being passed through the 3.3v regulator without adjustment. Did you get any errors when programming the board?

Also to answer your question, the button pad is just to allow a momentary tact switch to toggle the PMS on and off
 
Joined
Nov 10, 2024
Messages
4
Likes
2
Thank you very much for your reply.

I didn't even know that the board has to be programmed :XD:
Can you tell me how to perform the firmware installation?
 

Stitches

2 and a Half Dollarydoos
Staff member
.
.
Joined
Feb 5, 2017
Messages
4,292
Likes
3,328
Location
Banana Bender Land, Australia
Portables
6
You will need a PICKit 3 programmer and the free MPLABX software to load and flash the .hex file from the github. A clone PICKit 3 is fine, you don't need a genuine one for this. Once you have the PICKit and software installed, you insert the included jumper cable pins into the 5 holes by the B+ pad and apply finger pressure to tilt them sideways to make contact, soldering the pins in is unneccessary. The squared pin indicates alignment.

I can't give you the full procedure since it's been years since I've done this, but there are many step by step tutorials available for flashing a prebuilt hex file using MPLABX on youtube. Some are even specifically for the PICKit clones, they can have a couple of quirks you see. Make sure you plug yours into your PC's rear USB ports, else it might fail to show up in the device list. Mine had that particular problem, but otherwise worked as a genuine one would.
 
Joined
Nov 10, 2024
Messages
4
Likes
2
Thanks a lot, that's very helpful :)

UPDATE:
I assembled another PMS Board and flashed it without any problems.
It's working as intended.
The DuPont-Pins did not fit, so I had to use some Diode-Legs instead.

Thanks :)
 

Attachments

Last edited:
Top