Nicholas298's OSD+VOL Controller Board

Joined
Sep 8, 2019
Messages
207
Likes
515
Location
Louisiana
Portables
2
Notice: I would not use this for the N64HH build, that specific driver board will be released separate from this.

This is the release of my Custom PCB that allows you to use simple Button Combinations to control the display and volume of your portable!
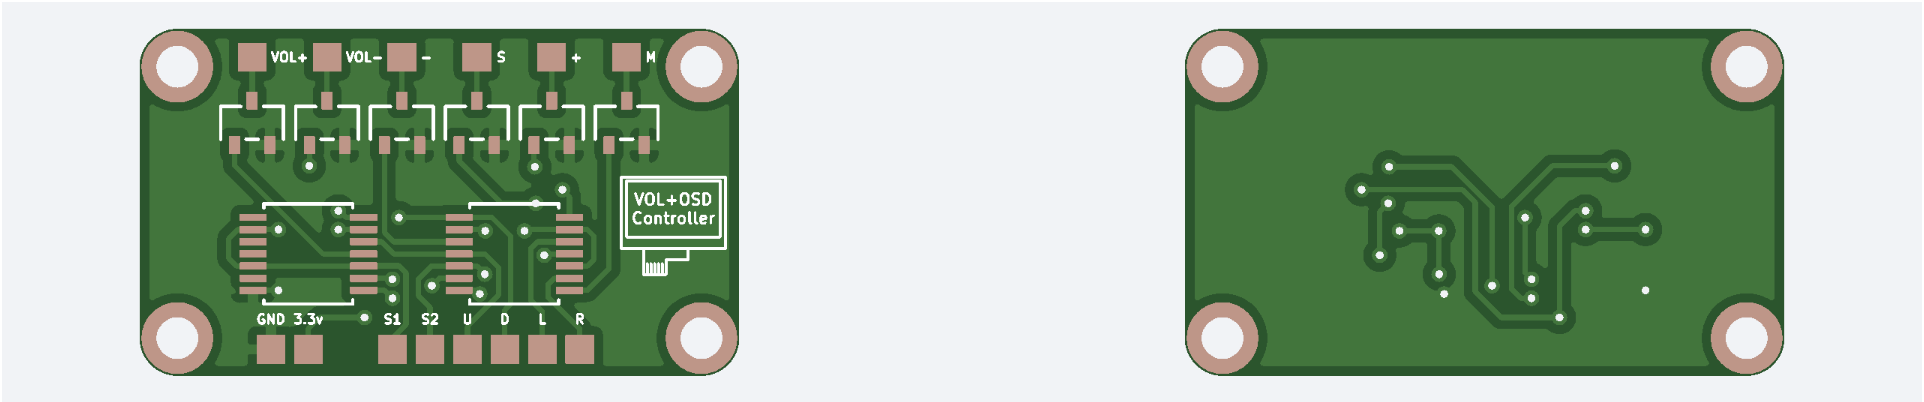
Screenshot 2024-03-17 at 11.30.16 AM.png

Pinout:
S1- Selector Button 1 (Volume Controls)
S2- Selector Button 2 (Screen Controls)
U- Up
D- Down
L- Left
R- Right

Volume Controls
S1 + U or D = Vol+ or Vol-

Screen Controls
S2 + D = -
S2 + L = S
S2 + U = +
S2 + R = M

BOM
2x SN74HCS7002QPWRQ1 (got mine from Digikey)
6x RK7002BMHZGT116 (also from Digikey)

Dimensions
Screw Holes are 28mm x 14.5mm

This project is almost a replica of CrazyGadget's OSD Controller board, he deserves most of the credit.
 

Attachments

Last edited:
Joined
Feb 14, 2024
Messages
10
Likes
5
This is awesome! Sorry if this is a stupid question, but which way are you supposed to orientate the SN74HCS11QPWRQ’s? I’m not very knowledgeable when it comes to electrical engineering and I don’t think I see any markers on the board itself.
 

Johni

.
Joined
Sep 3, 2020
Messages
4
Likes
1
Has anyone other than Nicholas298 gotten this to work? For some reason pressing S1 alone mute (I think it's triggering both vol+ and vol-) and pressing the any direction of the dpad triggers source. Not sure what is happening as my wiring is fine and reflowed everything multiple times. If anyone has any idea please let me know.
 
Joined
Feb 14, 2024
Messages
10
Likes
5
Has anyone other than Nicholas298 gotten this to work? For some reason pressing S1 alone mute (I think it's triggering both vol+ and vol-) and pressing the any direction of the dpad triggers source. Not sure what is happening as my wiring is fine and reflowed everything multiple times. If anyone has any idea please let me know.
I haven’t personally, but there are a few reasons it could’ve been. I oriented the chips in the wrong direction the first time, and also I’m terrible at hot air work. I have a feeling that when I oriented the two big chips upside down, I fried part of my GC+, and when I replaced the first OSD board with another one with the chips oriented correctly, it gave me weird glitches. However, I’m 99% sure the glitches were due to 1) the GC+ being messed up, and 2) I got the OSD board too hot when flowing the solder for the chips and wound up breaking and/or shorting traces together.

I have a new GC+ and VGA driver board, and I’m going to try and solder a new OSD board with just a soldering iron soon, so I’ll keep you updated on if it works.
 

Johni

.
Joined
Sep 3, 2020
Messages
4
Likes
1
I haven’t personally, but there are a few reasons it could’ve been. I oriented the chips in the wrong direction the first time, and also I’m terrible at hot air work. I have a feeling that when I oriented the two big chips upside down, I fried part of my GC+, and when I replaced the first OSD board with another one with the chips oriented correctly, it gave me weird glitches. However, I’m 99% sure the glitches were due to 1) the GC+ being messed up, and 2) I got the OSD board too hot when flowing the solder for the chips and wound up breaking and/or shorting traces together.

I have a new GC+ and VGA driver board, and I’m going to try and solder a new OSD board with just a soldering iron soon, so I’ll keep you updated on if it works.
May I know what are the glitches you‘re experiencing?
 
Joined
Feb 14, 2024
Messages
10
Likes
5
May I know what are the glitches you‘re experiencing?
Sure, but I have to remind you that I’m fairly certain I caused these glitches myself. It’s also been a few weeks since I had the Ashida fully together, so some of the details might be mixed up.

D-pad left stopped working after the first OSD board (with the backwards SN7 chips)

D-pad up or down (I’m pretty sure it was down) stopped working after the first OSD board (with the backwards SN7 chips)

After changing the OSD board for a new one with the SN7 chips properly oriented, my selector button for screen controls (ZL) would allow me to use the two directions on the D-pad that worked, but I was unable to select any options on the on-screen menu. I believe I fried something on my driver board that caused that.

I think that’s it.
 

Johni

.
Joined
Sep 3, 2020
Messages
4
Likes
1
Sure, but I have to remind you that I’m fairly certain I caused these glitches myself. It’s also been a few weeks since I had the Ashida fully together, so some of the details might be mixed up.

D-pad left stopped working after the first OSD board (with the backwards SN7 chips)

D-pad up or down (I’m pretty sure it was down) stopped working after the first OSD board (with the backwards SN7 chips)

After changing the OSD board for a new one with the SN7 chips properly oriented, my selector button for screen controls (ZL) would allow me to use the two directions on the D-pad that worked, but I was unable to select any options on the on-screen menu. I believe I fried something on my driver board that caused that.

I think that’s it.
I see, please let me know the result when you have them tested again. Thanks!
 
Joined
Feb 14, 2024
Messages
10
Likes
5
I see, please let me know the result when you have them tested again. Thanks!
Honestly, I could just be bad at microsoldering but I think this post might be a troll lmao

I re-did my Ashida completely in a new case with a new Wii trim, new LCD driver board, new GC+ 2.0, new OSD board, re-did all of the wiring, and I’m just getting more glitches with it. In the buttons tester section in RVLoader settings, the 2nd selector button (Z2 for me) presses that button and 2-3 of the D-pad buttons simultaneously, rendering it completely useless.

This time, I didn’t use hot air for the OSD board. I soldered every chip with my iron, and verified under a microscope that every individual leg was firmly soldered and that there was no bridging. Again, I might just be bad at soldering, but I’m fairly certain this thing just doesn’t work. Would love to know any tips OP might have, though.
 

Johni

.
Joined
Sep 3, 2020
Messages
4
Likes
1
Honestly, I could just be bad at microsoldering but I think this post might be a troll lmao

I re-did my Ashida completely in a new case with a new Wii trim, new LCD driver board, new GC+ 2.0, new OSD board, re-did all of the wiring, and I’m just getting more glitches with it. In the buttons tester section in RVLoader settings, the 2nd selector button (Z2 for me) presses that button and 2-3 of the D-pad buttons simultaneously, rendering it completely useless.

This time, I didn’t use hot air for the OSD board. I soldered every chip with my iron, and verified under a microscope that every individual leg was firmly soldered and that there was no bridging. Again, I might just be bad at soldering, but I’m fairly certain this thing just doesn’t work. Would love to know any tips OP might have, though.
Thanks for reporting back, glad I’m not imagining things. Seems like your issue matches with mine, pressing the selector button triggering other buttons as well.
 
Joined
Sep 8, 2019
Messages
207
Likes
515
Location
Louisiana
Portables
2
Oh my, first I want to apologize to anyone who has made one yet… I original put the required chip as (SN74HCS11QPWRQ) but the correct required chip is 2 (SN74HCS7002QPWRQ1)

I have updated this in the post and again, my bad for putting the wrong chip. I must have got them swapped when I originally made this post.. the HCS7002 is correct chip to use. @Johni @san_dingus
 
Last edited:
Joined
Feb 14, 2024
Messages
10
Likes
5
Oh my, first I want to apologize to anyone who has made one yet… I original put the required chip as (SN74HCS11QPWRQ) but the correct required chip is 2 (SN74HCS7002QPWRQ1)

I have updated this in the post and again, my bad for putting the wrong chip. I must have got them swapped when I originally made this post.. the HCS7002 is correct chip to use. @Johni @san_dingus
Lol, I fried two GC+ 2.0 D-pads with that thing. I don't know if I want to waste more money testing another board with those new 7002's. Thank you for confirming that the info was wrong, though; at least we know definitively what went wrong.
 
Top