Fellow BB comrades,
I have been hard at work over this weekend to get the case ready for building, and I’m chuffed with how the case has turned out after the hours of sanding, tweaking and bondo-ing my way to glorious victory. Strap yourself in!
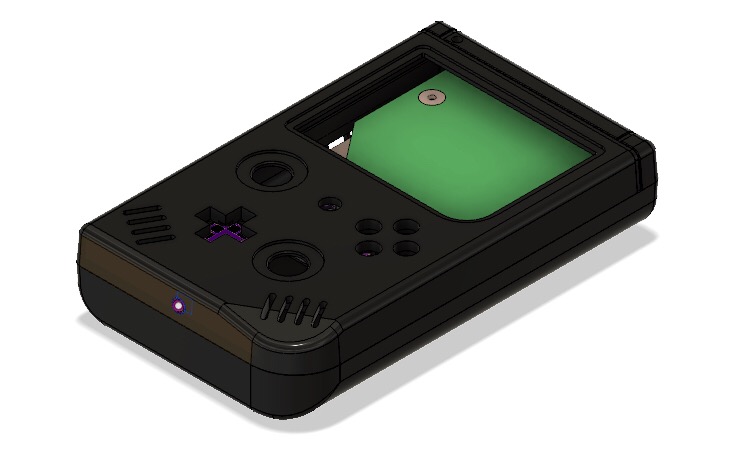
First I really wanted to get the battery cover down to feel as OG as possible to the real DMG. To do this, I did several iterative test prints to make sure that the teeth of the groove in the back case would successfully grab to the clip on the back battery cover. At first, the “gripping” point was much too high, which resulted in the back cover falling out. I adjusted the teeth on the back of the case as well as the grooves on the cover until I got something I was happy with. I also edited the overall thickness of the cover so it didn’t stick out too much.
After getting something that I was happy with, I moved on to doing the casework preparation which is apparently “relaxing” according to my good friend Wesk. Unfortunately sanding the DMG grooves in the back case isn’t an easy task. I ended up folding the sandpaper in half and then painstakingly sanded each groove. Never. Again.
Here was my painting prep process. The end result is always so rewarding, but the process is always a pain in my anal region.
Step 1:
Apply thicc primer to fill holes and lines creates from the FDM printer. Add a cheese foot for added effect.
Step 2:
Apply Bondo (Glazing and Spot Putty) to fill any of those stubborn pinholes, gaps or areas that the primer can’t get to. I really like the glazing and spot putty stuff. It dries really quickly and is so easy to sand. Its hard to get my hands on it so I ordered some from the USA.
Step 3:
Wet sand the bastard until it’s smoother than a baby’s backside. Repeat step 2 and 3 until a desired finish is achieved. Took me about 3-4 layers of bondo and priming application to get it smooth. Gave my baby a bath.
Step 3.5:
Compare to a G-Wii for a sense of scale. Really nice and should fit in my back pocket easily.
Step 4:
Apply a liberal yet light coating of primer for painting. Make sure to apply it thinly so that it doesn’t run. Enjoy a hot coffee.
Step 5:
Paint. I used MR. HOBBY’s primer and filler and then used Tamiya “Metallic Black” spray paint for plastics. When you use a metallic paint it’s really easy to spot the imperfections, so make sure you’ve done the prep work properly. I applied 3 thin coats, waiting 15 minutes between each coat. Full coverage was achieved on the final coat.
Step 6:
Apply sexy glass bezel for the 3.5 inch 240p VGA screen. I wanted to go for maximum aesthetics (and to somehow not end up cloning Gman 100%) so I added this. Turns on the radius of the bottom corner was 12.5mm. After a bit of pythagoras and help from Alec I was able to figure this out. I thought this picture looked really nice with the Wii inside.
Step 7:
Enjoy your work! It turned out really nice and professional in my opinion. Grab your parts and get ready for a great weekend of modding. Can’t wait to play this one! Enjoy the pictures guys, and thanks so much for introducing me to this hobby. I really have enjoyed myself so far, there’s never enough time left to do anything else these days, hehe. It’s really nice to have a personal hobby that’s outside of the work space, particularly in Tokyo where it can get lonely-ish at times. I also bought myself a PIC development board to learn how to program microcontrollers, which I have enjoyed so far. Flashed an LED, there’s always a beginning I guess!
Pictures below. Hopefully will put this together next weekend. Got all of the parts collected (USB-C board not pictured here). Stay tuned friends!

")

") hoping to finish before the deadline! I’m also going to be custom moulding my own DS lite ABXY buttons and dpad to match the paint finish with resin and sparkly things. Stay tuned.
hoping to finish before the deadline! I’m also going to be custom moulding my own DS lite ABXY buttons and dpad to match the paint finish with resin and sparkly things. Stay tuned.

 happy to see a project that I worked on in Eagle come to life and not cause any boom. Big thanks to the following guys for helping me out with that: Gman (for releasing his code to program the STUSB4500 IC registers and his awesome blog helping me out), Postman (for literally taking the time to write a 15 page guide on good PCB design practices like routing, layers, part placement etc) and BocuD (for providing moral support when things just were going shit lol)