
Worklog The s-WII-ch (my first Wii portable)
- Thread starter Lemoncake
- Start date
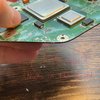
It looks good, but you only have a couple mm of room left on the top side before you hit the NAND tracesAlright everyone, good news. I finally tracked down the right sandpaper grits for sanding my Wii, and am about halfway there (I went from 80 grit to 400). But before I continue, I need to confirm something: have I accidentally sanded through any necessary components on the boards? I know I've sanded the board down quite a bit from what it originally was after the trim, and need to know if I messed anything up by sanding in as far in as I have.
View attachment 27994View attachment 27995
- Joined
- Nov 13, 2022
- Messages
- 241
- Likes
- 109
One more question. Is it alright if I stop sanding at 600 grit or should I go all the way to 1000? I don’t think my local hardware store carries sandpaper with that high of grit but if I need it I will track some down.It looks good, but you only have a couple mm of room left on the top side before you hit the NAND traces
600 is fine.
The important part of what you're doing is slowly stepping up in grit to remove the copper partitions of the board that stick out after you trim the board. These partitions sticking together will cause shorts.
As long as your resistance values are good after you sand. You can stop sanding.
The important part of what you're doing is slowly stepping up in grit to remove the copper partitions of the board that stick out after you trim the board. These partitions sticking together will cause shorts.
As long as your resistance values are good after you sand. You can stop sanding.
- Joined
- Mar 26, 2023
- Messages
- 153
- Likes
- 160
Yeah, my Wii worked okay, and I think I only sanded up to 400 grit. The resistances were also good, though, so you have to check that also.
Just be sure to inspect the layers with a magnifier to make sure there are no copper flakes that might cause shorts later if you stop before 600. Personally I stop at 800 for 4 layer boards
- Joined
- Nov 13, 2022
- Messages
- 241
- Likes
- 109
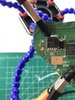
I used a magnifying glass to check the layers and honestly, they look pretty clean to me. However, there are these little nicks all over the rim of the board. They seem to have been caused by partially sanding through some of the little holes (I don't know the technical term) on the edges of the trim. Could these be causing shorts on the board (because I'm still experiencing a few)? Should I sand them so they are completely flat?Just be sure to inspect the layers with a magnifier to make sure there are no copper flakes that might cause shorts later if you stop before 600. Personally I stop at 800 for 4 layer boards

The little holes are called vias and unfortunatly I don't think they are the problemI used a magnifying glass to check the layers and honestly, they look pretty clean to me. However, there are these little nicks all over the rim of the board. They seem to have been caused by partially sanding through some of the little holes (I don't know the technical term) on the edges of the trim. Could these be causing shorts on the board (because I'm still experiencing a few)? Should I sand them so they are completely flat?
View attachment 28023View attachment 28024
- Joined
- Nov 13, 2022
- Messages
- 241
- Likes
- 109
Ok, what else besides unsanded edges is known to cause shorts on a board?The little holes are called vias and unfortunatly I don't think they are the problem
- Joined
- Mar 26, 2023
- Messages
- 153
- Likes
- 160
Flux can cause shorts, so you can clean that with isopropyl alcohol. Random solder blobs can short also, so you can clean those. If there are components that are on the trimming line you can remove those fully.Ok, what else besides unsanded edges is known to cause shorts on a board?
Nah, that's all on the same plane, it's fine.
- Joined
- Nov 13, 2022
- Messages
- 241
- Likes
- 109
That’s a relief! I tried copper wick and everything but it wouldn’t come off. I’m going to clean the board now and see if I get the right resistances (hopefullyNah, that's all on the same plane, it's fine.
 ) now that the sanding is done. I checked for partially cut-through components (there was only one and I removed it successfully) and to my knowledge there are no stray solder blobs either. After the cleaning we should be good to go
- Joined
- Nov 13, 2022
- Messages
- 241
- Likes
- 109
Aaaaaand still nothing. GND is still shorted to 1.8v, even though EVERY other resistance is fine. I've cleaned the board, sanded the board, made sure there are no solder blobs/partially cut through elements, I've even prayed over the stupid thing! Is there anything I'm missing? We've been trouble shooting this trim for months now, and still haven't gotten anywhere. If anyone has any clue what else I should try, I would be very grateful for the suggestions
Is it a dead short (0 ohms)? 1v8 to ground is usually around 36 ohms.
- Joined
- Nov 13, 2022
- Messages
- 241
- Likes
- 109
Not exactly dead, but the multimeter needs to be set to 200 to get anything, and even then it only registers as 0.1Is it a dead short (0 ohms)? 1v8 to ground is usually around 36 ohms.
Yeah that's a short then. Did you remove that resistor array that you sanded through on the top of the trim before?Not exactly dead, but the multimeter needs to be set to 200 to get anything, and even then it only registers as 0.1
- Joined
- Nov 13, 2022
- Messages
- 241
- Likes
- 109
Yeah. I'm pretty sure that was the only partially sanded through component.Yeah that's a short then. Did you remove that resistor array that you sanded through on the top of the trim before?